Steps for using Linux skills in embedded projects
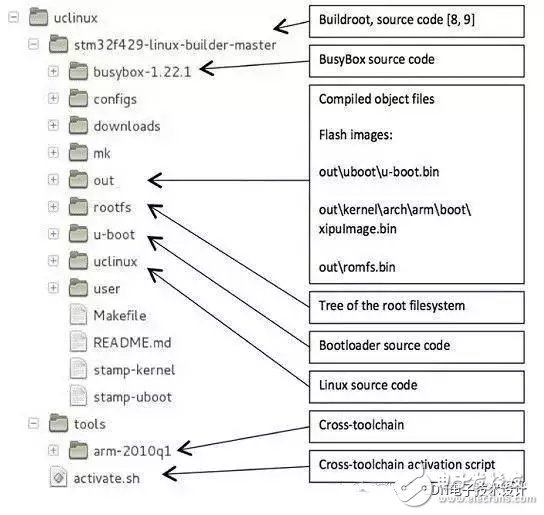
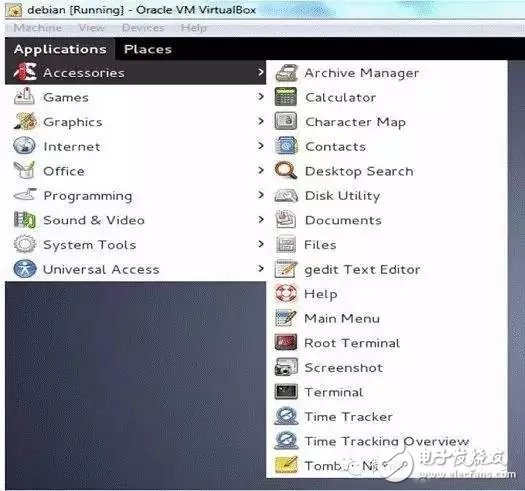
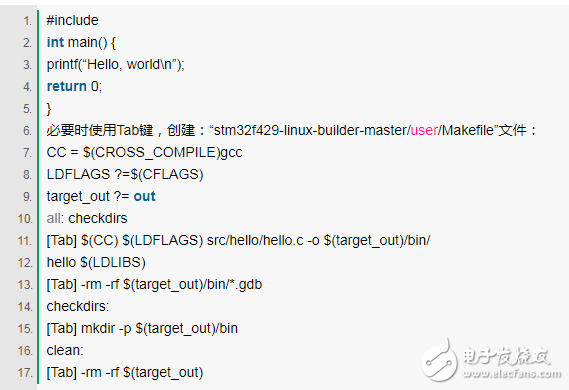
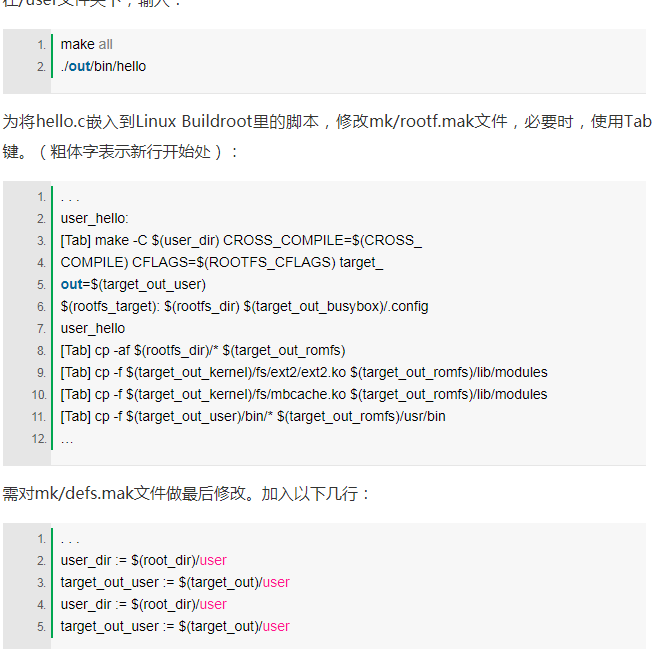
The microcontroller manufacturer's development boards, along with the software project routines they provide with the development board, can be of great help to the engineer as he embarks on a new design. However, after the design project has completed its early stages, the software provided by the manufacturer may also cause some problems when further designing. The design of using a real-time operating system as the application code platform also faces many challenges, such as how to assign functions to different parallel tasks, how to design highly reliable inter-process communication, and how to test the entire software package on the hardware. More and more OEMs have found that the best way to avoid these two problems is to start a new design using an open source, proven, scalable operating system Linux that can run on different hardware platforms. For the number of operating systems that have been ported to various computer hardware platforms, Linux is second to none. Derivatives of Linux have been run on a very wide range of embedded systems, including: network routers, mobile phones, building automation controls, televisions, and video game consoles. Although Linux was used successfully, it does not mean it is easy to use. Linux contains more than one million lines of code, and its operation has a distinctive flavor of Linux methodology. Beginners may find it difficult to grasp quickly. Therefore, the purpose of this article is to start a new design project for the use of Linux's embedded operating system version, μClinux. The guide is divided into five steps. To illustrate this guide, this article describes a μClinux project implementation on STMicroelectronics' STM32F429 microcontroller (ARM Cortex-M4 core, up to 180MHz) using Emcraft's STM32F429 Discovery Linux Board Support Package (BSP). Each embedded software design begins with choosing the right tool. A toolchain is a set of software development tools that are linked (or linked) together. It contains tools such as the GNU compiler set (GCC), binuTIls (a set of connectors, assemblers, and other development tools for object files and archive tools. ) and glibc (the C function library that provides system calls and basic functions) and other components; in some cases, it may include other tools such as compilers and debuggers. The toolchain for embedded development is a cross-toolchain. The more common name is the cross compiler. GNU BinuTIls is the first component of the embedded Linux toolchain. GNU BinuTIls contains two important tools: "as", assembler, converts assembly code (generated by GCC) to binary code "ld", a connector that connects a discrete object code segment to a library or an executable file The compiler is the second important part of the toolchain. In embedded Linux, it is called GCC and supports many microcontroller and processor architectures. Next is the C library. It implements Linux's traditional POSIX application programming interface (API), which can be used to develop user-space applications. It interfaces with the kernel through system calls and provides high-level services. Engineers have several C library options: Glibc is a library of available C functions provided by the Open Source GNU Project. The library is full-featured, portable, and it complies with the Linux standard. Embedded GLIBC (EGLIBC) is a derivative version optimized for embedded systems. Its code is streamlined, supports cross-compilation and cross-testing, and its source code and binary code are compatible with GLIBC. uClibc is another C library that can be used with limited flash memory space and/or minimal memory usage. The debugger is usually part of the tool chain as a debugger is required to debug the application while it is running on the target. In the embedded Linux field, GDB is a common debugger. The above tools are so essential, but when they are each fighting, it will take too long to compile the Linux source code and integrate it into the final image. Fortunately, Buildroot (the tool that automatically generates cross-compilation tools) automates the process of building a complete embedded system and simplifies cross-compilation by generating any or all of the following tasks: Cross-compilation tool chain Root file system Kernel image Boot image For embedded system designers, it is also convenient to use a tool (uTIlity) aggregation tool, such as BusyBox, which integrates the most commonly needed tools. According to BusyBox's information page, "it integrates the micro version of many popular UNIX tools into a small executable file. It provides an alternative to most of the tools you would normally see in tools such as GNU fileutils and shellutils. Tools in BusyBox are usually less selective than their full-featured version of GNU; however, the included options provide the expected functionality and behavior in much the same way that the corresponding GNU provides.BusyBox for any small or embedded system The environment provided is quite complete." The last important tool is a BSP that is specifically designed for motherboards equipped with project target MCUs or processors. The BSP includes pre-configured tools as well as a boot loader that loads the operating system onto the motherboard. It also provides source code for the core and device drivers (see Figure 1). Figure 1: The main components of the Emcraft BSP for the STM32F429 Discovery board. The typical embedded Linux startup sequence is as follows: 1) The boot loader firmware (U-Boot in the example project) runs on the target MCU's built-in flash memory (no external memory required) and performs all necessary initialization work after power-up/reset, including setting up the serial port and for external memory (RAM) accessed memory controller. 2) U-Boot transfers the Linux image from external Flash to external RAM and passes control to the kernel entry point in RAM. The Linux image can be compressed to save flash space at the expense of decompression time at startup. 3) Linux boots and installs a RAM-based file system (initramfs) as the root file system. When the project is built, Initramfs is populated with the required files and directories and then simply linked to the kernel. 4) In the Linux kernel, execute /sbin/init. The /sbin/init program initializes the system as described in the configuration file in /etc/inittab. 5) Once the initialization process completes the runlevel execution and the commands in /sbin/init, it starts a login process. 6) The execution of the shell initialization file /etc/profile marks the completion of the boot process. Execute In Place (XIP) can significantly reduce start-up time and improve overall performance. XIP is a method of executing code from flash memory. Typically, Linux code is loaded from flash memory to external memory and then executed from external memory. By executing from the flash memory, this step is no longer necessary, so that less memory is needed, and the read-only memory no longer occupies program space. The sample project for this article is based on the STM32F429 MCU. In fact, the user may find that the peripheral initialization of the STM32F4 series MCU is not easy to grasp at the beginning. Fortunately, STMicroelectronics has developed some tools to help solve this problem. The STM32CubeMX initialization code generator (part number UM1718) is the latest. The tool includes every detail of the initialization of the peripherals. When configuring the peripherals, warnings and errors are displayed and hardware conflicts are warned. For small embedded Linux projects, the internal flash memory of the STM32F429 MCU is sufficient. It is important to remember that multiple binary images (bootloader, Linux kernel, and root file system) are used in embedded Linux projects: these all require flash sector boundary alignment. This avoids the risk of another image being partially deleted or damaged when loading an image. To build an embedded Linux project, a Linux host is required. For Windows PCs, it is best to install Oracle VirtualBox to create a new virtual machine with "a" 512Mbyte RAM and 16Gbyte hard drive. There are many Linux versions available; according to my experience, Debian is a match for the VirtualBox environment. The Linux host must have access to the Internet to download the GNU cross-compilation tool for this ARM Cortex-M target MCU. The designer will create a tree structure similar to the one shown in Figure 1, and save the cross-build tool to the /tools folder. At this point, it is necessary to create an ACTIVATE.sh script. Just use the following code to achieve. (".. .." is the path to the extracted GNU tool folder): Export INSTALL_ROOT=. .. . .. . 》 export PATH=$INSTALL_ROOT/bin:$PATH export CROSS_COMPILE=arm-uclinuxeabiexport CROSS_COMPILE_APPS=arm-uclinuxeabiexport MCU=STMDISCO export ARCH=arm Installing GNU tools on a clean Linux system, but its use is not self-sufficient, in fact, it also requires the cooperation of other systems. Its operation actually depends on several other system components (such as the host C/C++ compiler, standard C library headers, and some system tools). One way to obtain these necessary components is to install the Eclipse Integrated Development Environment (IDE) for C. In addition to solving this looming problem, the Eclipse IDE can also help in many other aspects of the development process. Of course, the specifics of the Eclipse IDE are not the purpose of this article. Now, it's time to enable the Linux terminal tools: Click on Applications, then Accessories and Terminal (see Figure 2). Figure 2: Linux includes "Terminal" tools and "Files," a graphical tool similar to Windows Explorer. The terminal is the main tool for configuring Linux hosts and building embedded Linux applications. Type the following command to install Eclipse and other required tools: Su [enter root password] apt-get install eclipse-cdt apt-get install genromfs apt-get install libncurses5-dev apt-get install git apt-get install mc The final step in preparing the Linux project is to download the STM32F429 Discovery Buildroot and unzip it to the /uclinux folder. It is now necessary to close the terminal that previously used the root user profile and start a new terminal. Enter "mc" on the command line and use the Navigator to navigate to "Documents" and enter the "uClinux" command. Press Ctrl+O and activate the Linux ARM Cortex-M development section and run the ".ACTIVATE.sh" command. Press Ctrl+O again and enter the "stm32f429-linux-builder-master" folder. The user now has two choices. If you use the sample project in VirtualBox, follow the "make clean" and "make all" command sequences. If you are preparing a completely new environment, use the "make" command. After about 30 minutes, the new μClinux image will be available as follows: Out\uboot\u-boot.bin out\kernel\arch\arm\boot\ xipuImage.bin outomfs.bin Write these new images to flash memory. If using the Windows and ST-LINK tools, the following code will work: ST-LINK_CLI.exe -ME ST-LINK_CLI.exe -P "u-boot.bin" 0x08000000 ST-LINK_CLI.exe -P "xipuImage.bin" 0x08020000 ST-LINK_CLI.exe -P "romfs.bin" 0x08120000 Connect the serial console to the target board (external RX=â€PC10, external TX=â€PC11, 115200 bits/s, 8 data bits, no parity, 1 stop bit pattern) and press Under the reset button, the μClinux project will start running. The boot output will be displayed on the serial debugger and the Linux penguin logo will appear on the display. Now, follow the code example and the instructions below to add a user application to the μClinux project. Through the activate.sh script, the host tests the application "Hello, world" without activating the cross compilation environment. Once the image is built, downloaded, and run on the target MCU, the application and other existing applications can be found in the /usr/bin directory. Type "hello" on the terminal connected to the Discovery board to test the application. Insulated Copper Tube Terminals Insulated Copper Tube Terminals,High quality insulated terminal,copper tube terminal Taixing Longyi Terminals Co.,Ltd. , https://www.txlyterminals.com