Crystal vibration tester measurement method - Database & Sql Blog Articles
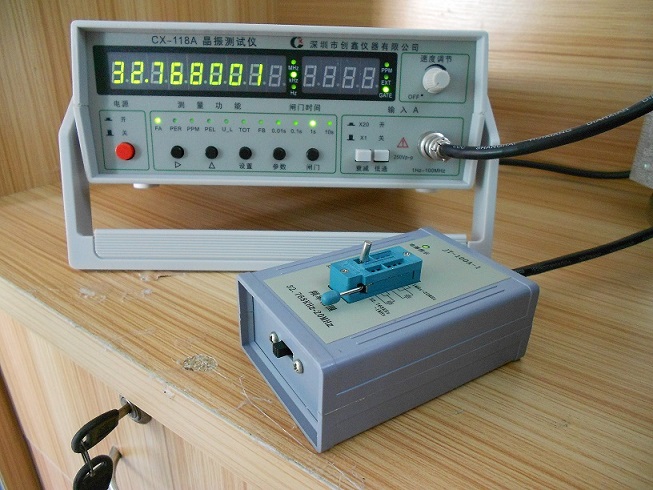
Before starting, make sure you have unpacked the package and retrieved the testing instrument along with the power cord. Place the test box in a clean, well-ventilated, and dust-free area. Follow these steps to operate the device: 1. Connect the power cord to the instrument’s power socket and the other end to a standard 220V, 50-60Hz power outlet. Once turned on, the green indicator light on the top-left corner of the front panel will illuminate. 2. Attach the test interface of the test box to the front panel of the tester. Ensure that you hear a “click†when the connector is properly inserted (the notch should align correctly). 3. Turn on the power switch located at the bottom left of the front panel. When activated, the current display should show “10,000000000.†At the same time, the upper-left gate indicator will light up and flash. The gate time light should be set to “1S,†indicating that the self-calibration function is active. The top-right display should show “MHZ,†confirming that the instrument is functioning normally and the display reads “10MHE.†4. Use the mobile function keys to select between frequency measurement, error measurement, and frequency setting modes. 5. For frequency measurement, there are two interfaces on the right side of the front panel. The input interface is used for measuring active signals, while the plug-in interface is designed for crystal testing. A crystal test box is required for this process. Note: Both interfaces cannot be used simultaneously. 6. To measure frequency error, switch the function key to “error.†Insert the crystal under test into the designated port on the test box. The display will then show the PPM value of the crystal. If the crystal has a negative deviation, the display will show a “-†symbol. If it's positive, no symbol will appear. The unit displayed on the top-right corner of the front panel will be in PPM. 7. Adjust the sampling time using the move key to control the test speed. The available sampling times are: 0.01S (fastest), 0.1S, 1S, and 10S (slowest). For higher accuracy, it's recommended to use 0.1S or 1S. The longer the sampling time, the more accurate the result will be. 8. Frequency settings allow you to define the reference frequency for comparison. If the crystal being tested has a frequency of 32.768kHz, the instrument will display that value by default. Changing the set frequency can lead to inaccurate results. Therefore, the factory setting is 32.768kHz. Only change the setting if the measured frequency differs significantly from the expected value. 9. Warning: The plug-in interface on the lower right of the front panel must not come into contact with metal objects, as this could damage the instrument. 10. Press the interference key only when the frequency is below 1 MHz. Failing to do so may result in inaccurate measurements. Avoid pressing the interference button when measuring frequencies in the MHz range. 11. If the measured frequency exceeds 5V, press the attenuation button to reduce the signal level before proceeding with the test. 12. In case the instrument crashes due to incorrect operation (e.g., it fails to enter the working state), turn it off. After releasing the red button, restart the device following the initial setup instructions. Lenovo Chromebook 100E Gen2 AST Lenovo Chromebook 100E Gen2 AST,Lenovo Chromebook 100E parts,Lenovo Chromebook 100E LCD back cover S-yuan Electronic Technology Limited , https://www.syuanelectronic.com