Crystal vibration tester measurement method - Database & Sql Blog Articles
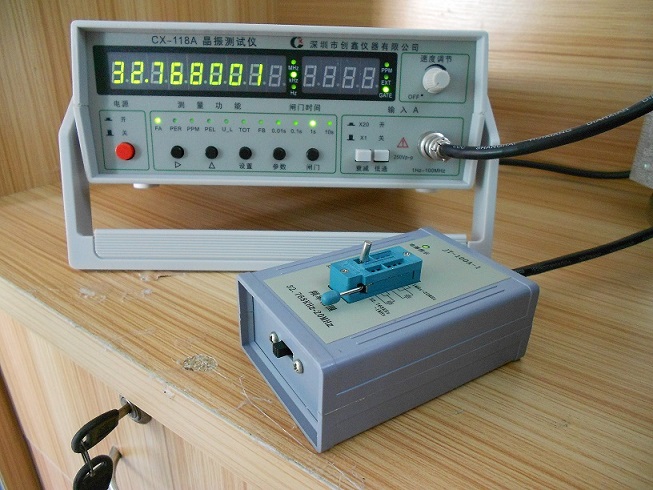
When you open the package, you will find the test instrument, power cord, and the test box. Place the device in a clean, well-ventilated, and dust-free area before use. Follow these steps to operate the device: 1. Connect the power cord to the power socket on the back of the instrument and the other end to a standard 220V, 50-60Hz power outlet. When the power is turned on, a green indicator light on the top-left corner of the front panel should illuminate. 2. Attach the test interface of the test box to the front panel of the tester. Make sure that the connector clicks into place properly when inserted. 3. Turn on the power switch located at the bottom left of the front panel. Pressing the red button will cause the display to show "10,000000000". At the same time, the upper-left gate indicator will blink. The gate time indicator shows "1S", which means the self-calibration function is active. The upper-right corner displays "MHZ", indicating that the device is operating normally. The screen should now show "10MHE". 4. Use the mobile function keys to select between frequency measurement, error measurement, and frequency setting modes. 5. For frequency measurement, there are two interfaces on the right side of the front panel. The input interface is used for testing active signals, while the plug-in interface is for crystal measurements. A crystal test box is required for crystal testing. Note: Only one interface can be used at a time. 6. To measure frequency error, select the "error" mode. Insert the crystal into the designated slot on the test box. The display will show the PPM value of the crystal being tested. If the crystal has a negative deviation, the display will show a "-" symbol. If it's positive, no symbol is shown. The unit on the top right of the front panel indicates the PPM value. 7. Adjust the sampling time (i.e., test speed) using the key. The available sampling times are: 0.01S, 0.1S, 1S, and 10S. The shortest time (0.01S) is the fastest, while the longest (10S) is the slowest. For higher accuracy, it's recommended to use 0.1S or 1S for testing. The faster the sampling speed, the lower the accuracy. 8. Settings are used to define the reference frequency for comparison. If the measured crystal frequency is 32.768kHz, the instrument will display this value by default. Changing the set frequency may lead to inaccurate results. Therefore, the factory settings are pre-configured to 32.768kHz. Avoid changing the setting unless necessary. If the readings seem off, double-check that the reference frequency matches the expected value. 9. Be careful not to short-circuit the plug-in interface on the lower right of the front panel with any metal object, as this could damage the instrument. 10. Press the interference key only when the frequency is below 1 MHz. Failing to press it may result in inaccurate measurements. Do not use the interference key when measuring frequencies in the MHz range. 11. If the measured signal exceeds 5V, press the attenuation button to reduce the input level. 12. If the instrument freezes due to incorrect operation, turn it off. Once the red button pops up, restart the device following the initial setup steps. HP Laptop 240 245 G10,hp 240 g10,hp 240 10 replacement parts,hp 240 g10 keyboard S-yuan Electronic Technology Limited , https://www.syuanelectronic.com